Showing posts with label Bracelet Finishing Tutorial. Show all posts

Friday, March 12, 2021

Tutorial: Beaded Toggle with Rolled End to Bracelet (Part 2)

This tutorial looks at the the other end of the clasp where the loop the toggle passes through is situated.  It is a direct follow on from last weeks tutorial and is not meant to be read by itself.


Mirroring

If you want your bracelet to look the same on both sides where there is a pattern, you will need to mirror the pattern.  The highlighted beads are all part of the rolled edge, corresponding to the peach beads in other diagrams.

The blue row of beads would be the last row of your pattern, say for example this was row 180 in the pattern.  The next row would be exactly the same as row 179 as shown by the two red highlighted rows.  The next row would be the same as row 178 as shown by the green beads.  The last row to be added would be the same as row 177 as shown by the pink highlighted beads.  Finally you would make the roll by stitching in to the yellow beads as if they were the next row.  This leaves the blue beads on the very end.


Rolled Edge to Bracelet End

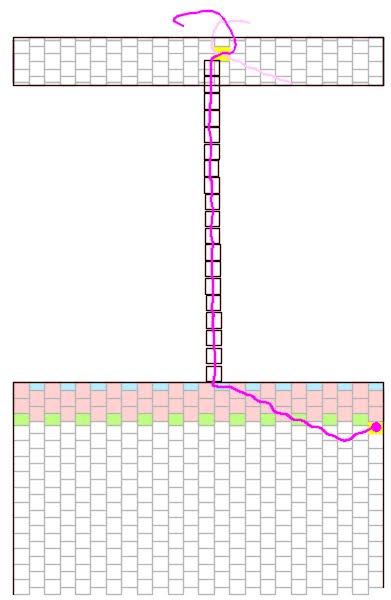
Begin by creating the piece of beadwork that will go across the very end of the bracelet.  This is 24 columns across and 15 rows deep.  Leave a decent tail thread.  The beads highlighted peach are going to form the rolled edge at the very end of the bracelet.  

The technique is exactly the same as for the rolled edge in part 1 of this tutorial.  The diagram below shows the thread path, but if you need this broken down in to steps, please refer to part 1 of this tutorial.


First Rolled Edge to Clasp Hole

This rolled edge is slightly different as it makes a bit more of a fold back than a cylinder, which gives the bracelet a front and a back.  To the front, the beadwork will appear almost flat while to the rear the extra beads give it two distinct ridges.  The folds are structural to help the clasp hole keep its shape.


Switch to the tail thread, leaving the rolled edge thread in place as you will still need it.

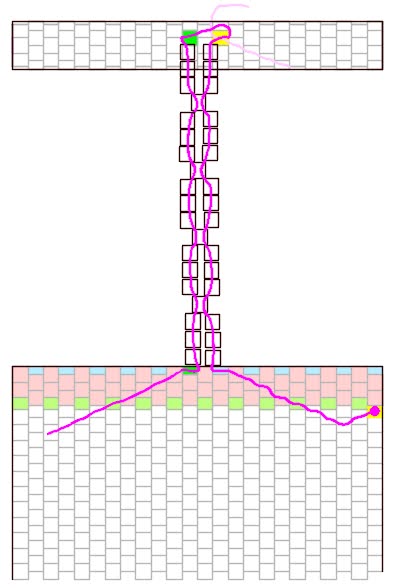
Stitch through the first six columns and then create a tab of peyote twelve columns wide and four rows deep.

The rolled edge again uses the last eight rows but in this instance, some of the rows are part of the wider piece of beadwork as shown below.

Zip up the two sides of the rolled edge as before.

Finish the thread off in your usual way.


First Side to the Clasp Hole

Take the thread you used to create the rolled edge for the end of the bracelet and start creating the first side of the clasp hole by creating a peyote tab six columns wide.  Do not stitch through any of the rolled edge beads highlighted peach.  Make the tab 9 rows deep.

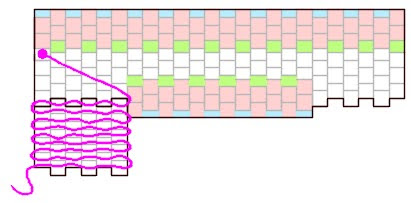
Set this piece of beadwork to one side without finishing the thread off as you will need it to attach it to the bracelet.


Second Rolled Edge to Clasp Hole

Take the remaining thread at the end of the bracelet and work in six columns and then create a tab of peyote twelve columns wide and four rows deep.

The peach highlighted beads show the ones that will create the rolled edge.  Create the rolled edge by zipping the two sides together in exactly the same way as before.  Make sure it folds the same way as the other rolled edge to the clasp hole.  The side you have already created should sit on the left hand side of the bracelet.  


Second Side to the Clasp Hole

Stitch across the beadwork in order to begin the second side.

Create a tab 9 rows deep and six columns across, do not pass through any of the beads associated with rolled edge.


Joining the Two Parts of the Clasp

Position the two parts of the clasp as shown.  It should be pretty clear that the two sides are setup ready to join the clasp together with the threads positioned correctly!

Zip the two joins together without stitching into the rolled edges of the clasp hole and then finish your threads in your normal way.

And now your clasp is finished!


Friday, March 5, 2021

Tutorial: Beaded Toggle with Rolled End to Bracelet (Part 1)

This is similar to a beaded clasp I made for my Bright Tartan Bracelet but this tutorial gives a generic version of the clasp.


Toggle

The toggle is made from a piece of beadwork with the same number of columns as your bracelet.  In this example there are 24 columns.  Begin by making a piece of beadwork 12 rows deep so that the beadwork has six beads on both ends.

The beadwork is then turned into a cylinder by zipping up the first and last rows.  Begin by threading through the high bead on the opposite end of the beadwork, highlighted in yellow.

Take the the thread over the beadwork and thread through the first high bead, highlighted green in the diagram below.  Keep the thread going in the same direction as the join.  Pull tight and the two sides of the beadwork will pull together, eventually slotting together to make a cylinder with no obvious join although right now it probably looks like a pea pod mostly split open.

Thread through the second bead on the second side of the beadwork, now highlighted yellow.  The beadwork is shown as flat for clarity.

Thread through the second high bead on the first side, now highlighted green.  Keep pulling the thread tight so that he cylinder forms and the beads pull together like the teeth of a zipper.

From here, just keep going, the diagram below shows the thread path.  Make sure the thread always takes the short path between the two sides of the beadwork, if it takes the long path it will be wrapped around the outside of the cylinder when you have finished and will be visible.

Stitch through eleven beads to reach near the centre of the cylinder toggle.  This will be the point at which you begin the stalk to attach the toggle to the bracelet.


Rolled End of bracelet

The rolled end gives the end of the bracelet additional strength so that it keeps its shape better.  It's effectively a little cylinder but a smaller one than the toggle.  You only want to consider the beads that will be part of the cylinder as shown in the diagram below where the cylinder beads are highlighted in peach.  Either add a new thread or use an existing thread.

Stitch through from the edge through the first bead highlighted yellow in the peach section.

Stitch through the first high bead on the end of the bracelet, now highlighted green.  As you pull it tight it will start to form the cylinder at the end of the bracelet and the yellow and green highlighted beads should start to zip together.  give a gentle tug if they don't.

Stitch through the next bead highlighted yellow in the peach section.

Stitch through the second high bead on the end of the bracelet, now highlighted green.

From here, just keep going, the diagram below shows the thread path. Make sure you keep to the beads highlighted peach until the cylinder is complete.

Now the cylinder is completed, it's fine to stitch through any of the beads from the white or peach section of the beadwork.  Stitch into the bead highlighted yellow, which was part of the white section.

The last diagram shows the rolled edge with the light green and blue beads being part of the peach cylinder section.  The light green beads are partially visible as they are underneath.  The light blue beads are the ones on the end.  Stitch through so that you are eleven beads in from the edge, exiting a bead on the very end.  This will be an anchor point for the stalk connecting the rolled end of the bracelet to the cylinder toggle.

Note:  If you want to have both sides of your bracelet the same, you will need to mirror your choices on the rolled edge.  This is included in next weeks tutorial.

Stalk (Connects bracelet to toggle)

The stalk needs to be long enough that when you bend the toggle along its length, the toggle end does not reach the bracelet.  So the stalk needs to be longer than half the length of the toggle.  In this case the toggle was 24 beads long so I made the stalk 19 beads long.

Using the thread exiting the end of the bracelet, pick up 19 beads, stitch in to the bead highlighted yellow, that the thread on the toggle exits (11 beads from end of toggle).

Stitch through the beads of the toggle to exit the bead highlighted green.

Pick up three beads then stitch through the fourth bead of the stalk.

Pick up three beads then stitch through the eight bead of the stalk.

Pick up three beads then stitch through the twelfth bead of the stalk.

Pick up three beads then stitch through the sixteenth bead of the stalk.

Pick up three beads then stitch through the anchor bead on the end of the rolled edge of the bracelet, highlighted green.

Weave away your thread and finish in your usual way.

Take the thread that you left in position on the toggle, which is now dark pink with the existing stalk thread being now light pink.  Stitch all the way down one side of the stalk to the bracelet.

Stitch through the anchor bead highlighted yellow on the edge of the rolled edge.

Stitch through the bracelet to exit the green highlighted anchor bead.

Stitch up through the other side of the stalk to the toggle, going through the second anchor bead, highlighted green.

Weave away the thread and finish in your usual way.

See next weeks blog post for part 2!


Inspiration: Eggs

When it comes to Easter, chocolate eggs are the first thing many think of.  Certainly I love them!  Eggs are a symbol of fertility and acros...