This is similar to a beaded clasp I made for my Bright Tartan Bracelet but this tutorial gives a generic version of the clasp.

Toggle
The toggle is made from a piece of beadwork with the same number of columns as your bracelet. In this example there are 24 columns. Begin by making a piece of beadwork 12 rows deep so that the beadwork has six beads on both ends.

The beadwork is then turned into a cylinder by zipping up the first and last rows. Begin by threading through the high bead on the opposite end of the beadwork, highlighted in yellow.

Take the the thread over the beadwork and thread through the first high bead, highlighted green in the diagram below. Keep the thread going in the same direction as the join. Pull tight and the two sides of the beadwork will pull together, eventually slotting together to make a cylinder with no obvious join although right now it probably looks like a pea pod mostly split open.

Thread through the second bead on the second side of the beadwork, now highlighted yellow. The beadwork is shown as flat for clarity.

Thread through the second high bead on the first side, now highlighted green. Keep pulling the thread tight so that he cylinder forms and the beads pull together like the teeth of a zipper.

From here, just keep going, the diagram below shows the thread path. Make sure the thread always takes the short path between the two sides of the beadwork, if it takes the long path it will be wrapped around the outside of the cylinder when you have finished and will be visible.

Stitch through eleven beads to reach near the centre of the cylinder toggle. This will be the point at which you begin the stalk to attach the toggle to the bracelet.

Rolled End of bracelet
The rolled end gives the end of the bracelet additional strength so that it keeps its shape better. It's effectively a little cylinder but a smaller one than the toggle. You only want to consider the beads that will be part of the cylinder as shown in the diagram below where the cylinder beads are highlighted in peach. Either add a new thread or use an existing thread.

Stitch through from the edge through the first bead highlighted yellow in the peach section.

Stitch through the first high bead on the end of the bracelet, now highlighted green. As you pull it tight it will start to form the cylinder at the end of the bracelet and the yellow and green highlighted beads should start to zip together. give a gentle tug if they don't.

Stitch through the next bead highlighted yellow in the peach section.

Stitch through the second high bead on the end of the bracelet, now highlighted green.

From here, just keep going, the diagram below shows the thread path. Make sure you keep to the beads highlighted peach until the cylinder is complete.

Now the cylinder is completed, it's fine to stitch through any of the beads from the white or peach section of the beadwork. Stitch into the bead highlighted yellow, which was part of the white section.

The last diagram shows the rolled edge with the light green and blue beads being part of the peach cylinder section. The light green beads are partially visible as they are underneath. The light blue beads are the ones on the end. Stitch through so that you are eleven beads in from the edge, exiting a bead on the very end. This will be an anchor point for the stalk connecting the rolled end of the bracelet to the cylinder toggle.

Stalk (Connects bracelet to toggle)
The stalk needs to be long enough that when you bend the toggle along its length, the toggle end does not reach the bracelet. So the stalk needs to be longer than half the length of the toggle. In this case the toggle was 24 beads long so I made the stalk 19 beads long.
Using the thread exiting the end of the bracelet, pick up 19 beads, stitch in to the bead highlighted yellow, that the thread on the toggle exits (11 beads from end of toggle).
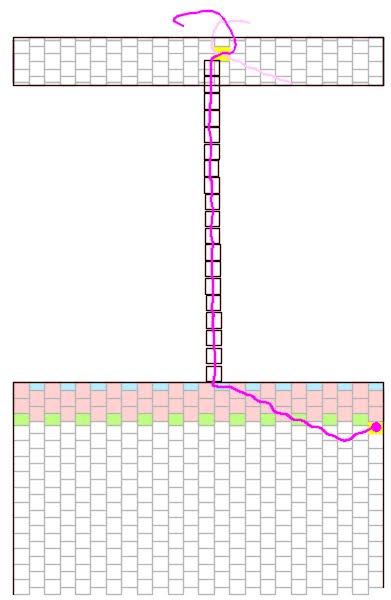
Stitch through the beads of the toggle to exit the bead highlighted green.

Pick up three beads then stitch through the fourth bead of the stalk.

Pick up three beads then stitch through the eight bead of the stalk.

Pick up three beads then stitch through the twelfth bead of the stalk.

Pick up three beads then stitch through the sixteenth bead of the stalk.

Pick up three beads then stitch through the anchor bead on the end of the rolled edge of the bracelet, highlighted green.

Weave away your thread and finish in your usual way.
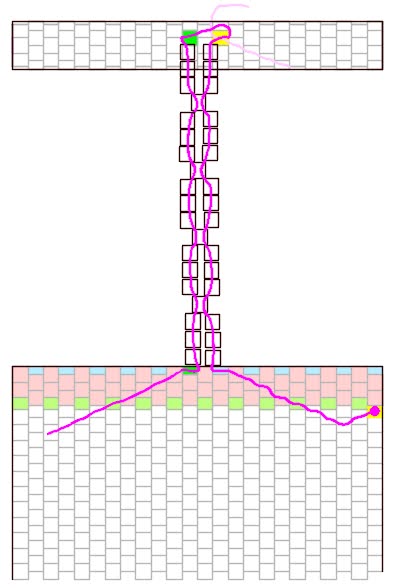
Take the thread that you left in position on the toggle, which is now dark pink with the existing stalk thread being now light pink. Stitch all the way down one side of the stalk to the bracelet.

Stitch through the anchor bead highlighted yellow on the edge of the rolled edge.

Stitch through the bracelet to exit the green highlighted anchor bead.

Stitch up through the other side of the stalk to the toggle, going through the second anchor bead, highlighted green.

Weave away the thread and finish in your usual way.

See next weeks blog post for part 2!


No comments:
Post a Comment