This tutorial looks at the the other end of the clasp where the loop the toggle passes through is situated. It is a direct follow on from last weeks tutorial and is not meant to be read by itself.
Rolled Edge to Bracelet End
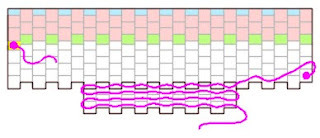
Begin by creating the piece of beadwork that will go across the very end of the bracelet. This is 24 columns across and 15 rows deep. Leave a decent tail thread. The beads highlighted peach are going to form the rolled edge at the very end of the bracelet.
The technique is exactly the same as for the rolled edge in part 1 of this tutorial. The diagram below shows the thread path, but if you need this broken down in to steps, please refer to part 1 of this tutorial.
First Rolled Edge to Clasp Hole
This rolled edge is slightly different as it makes a bit more of a fold back than a cylinder, which gives the bracelet a front and a back. To the front, the beadwork will appear almost flat while to the rear the extra beads give it two distinct ridges. The folds are structural to help the clasp hole keep its shape.
Switch to the tail thread, leaving the rolled edge thread in place as you will still need it.
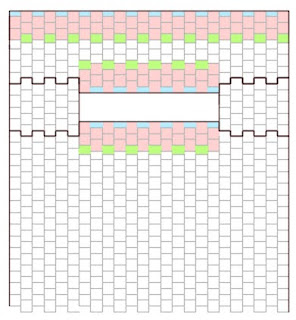
Stitch through the first six columns and then create a tab of peyote twelve columns wide and four rows deep.
The rolled edge again uses the last eight rows but in this instance, some of the rows are part of the wider piece of beadwork as shown below.
Zip up the two sides of the rolled edge as before.
Finish the thread off in your usual way.
First Side to the Clasp Hole
Take the thread you used to create the rolled edge for the end of the bracelet and start creating the first side of the clasp hole by creating a peyote tab six columns wide. Do not stitch through any of the rolled edge beads highlighted peach. Make the tab 9 rows deep.
Set this piece of beadwork to one side without finishing the thread off as you will need it to attach it to the bracelet.
Second Rolled Edge to Clasp Hole
Take the remaining thread at the end of the bracelet and work in six columns and then create a tab of peyote twelve columns wide and four rows deep.
The peach highlighted beads show the ones that will create the rolled edge. Create the rolled edge by zipping the two sides together in exactly the same way as before. Make sure it folds the same way as the other rolled edge to the clasp hole. The side you have already created should sit on the left hand side of the bracelet.
Second Side to the Clasp Hole
Stitch across the beadwork in order to begin the second side.
Create a tab 9 rows deep and six columns across, do not pass through any of the beads associated with rolled edge.
Joining the Two Parts of the Clasp
Position the two parts of the clasp as shown. It should be pretty clear that the two sides are setup ready to join the clasp together with the threads positioned correctly!
Zip the two joins together without stitching into the rolled edges of the clasp hole and then finish your threads in your normal way.
And now your clasp is finished!


No comments:
Post a Comment