Friday, October 30, 2020

Tutorial: Bead Slide Tube Brooch


This week we have a tutorial to finish a brooch rather than a bracelet!

This a 43mm toob brooch finding which attaches to a piece of peyote which has been finished with a row of brick stitch beads that then slides into the tube.

Create a piece of peyote beadwork 32 columns wide and 65 rows deep. A brooch does not have the same pressure on the clasp as a necklace, so there is no need to start a new thread before adding the brick stitch beads.

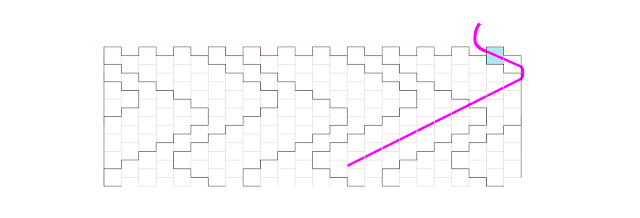
Weave through the beadwork until you are exiting the bead highlighted yellow as shown below.

Weave through to the first high bead of the last row shown in blue.

Pick up a size 11 delica bead.  These tubes will take size 11 beads and smaller and these beads will not be visible so any colour can be used.  The brick stitch beads are shown as being larger in the diagram to help differentiate them to the peyote beads.

Stitch back through the bead highlighted blue so that the brick stitch bead sits on top of the bead highlighted blue.

Stitch through to the next high bead shown in green and add another bead on top using brick stitch.

Continue along the beadwork until you have a full row of brick stitch beads on top of all the high beads of the end of the peyote beadwork.


The clasp has two flaps that can be pushed down to close the ends of the tube.  One end should be closed and a pair of pliers can be used to do this.  Feed the brick stitch beads into the tube so that the threads joining them to the peyote beadwork slit in the slot in the tube.

Push the other flap down at the second end of the tube so that the brick stitch beads can not come out of the tube.

Your brooch is ready to wear!

Monday, October 26, 2020

Inspiration: Halloween Hazards - Biohazard

Sometimes inspiration hits quickly and it comes with a fully formed idea.  Biohazard was like that.

Someone in a bead group I belong asked if anyone knew of a pattern for a biohazard symbol for a keyring.  The next morning, I woke up with a fully formed idea in my head.

With a scientific background, I am used to these symbols, mostly.  There are a lot of them!  The craze for zombies means that any sci fi fantasy fan is probably familiar with the biohazard symbol.  This year too, has been all about biohazards as Covid has had an impact on everyone's lives.  One way or another, biohazards are a real halloween horror this year....

A biohazard is a substance that is hazardous to human health that is biological in origin, so it includes viruses.  The symbol is used as a warning marker and this includes human waste, used needles, toxins and microorganisms.  It was developed by Charles Baldwin and the Dow Chemical Company.  They wanted to make an entirely new symbol that was different to anything else so that they could then educate people as to it's meaning and it would not be confused with anything else.  Before this symbol, there was no standard and the symbols used by many organisations were not distinctive.

Charles Baldwin however did not approve of it being used for other purposes.  At a seminar on biohazards, participants were given a tie with little biohazard symbols all over it.  In his own words, he sent the organiser a nasty letter.  He certainly would not approve of it's connection to zombies and common use in such horror films and images.  He would not like this bracelet either....

The background of the bracelet is lime green with various neon greens to represent biological matter, plants particularly...  but it's not supposed to be entirely pretty, it's lurid...  but contained in a black frame.  Blood also features round the symbol itself.  This is not a new idea to me as many people have modified the symbol in this way.  It's striking and in my view, really suitable for Halloween this year.

Want to look at the images which inspired me on pinterest?


Friday, October 23, 2020

Tutorial: Beadslide Clasp (All in one)


Weave any loose ends into the beadwork and finish as you normally would for your choice of thread.  Do not remove the final working thread from the beadwork at this point, in case you need to adjust the bracelet length.

For this bracelet I used a 29x10mmrhodium plated beadslide clasp.  The two parts of the clasp slide together and can be released by pressing the lever to one side.  These are relatively expensive clasps but give a really classy look. These bead slides can take beads up to Size 8.


I like to finish the existing thread and begin a new thread for the clasp.  This means that if the clasp thread should wear through, the beadwork will remain intact.

Working at the end marked start in the diagram above, add a new thread and exit the bead shown in the close up below.

Thread through to the first bead of the last row (highlighted in blue) and thread through it.

Pick up the first bead slide bead.


Thread through the previous bead from the original beadwork (highlighted in blue) in the same direction as before (brick stitch).

Stitch through the beadwork to the next high bead (highlighted) and pass the thread through it.

Carry on adding the bead slide beads in the same way across the end of the beadwork and finish the thread off.

The bead slide clasp consists of a clasp with two bead tubes either side.  Each bead tube has a slit down the side and at the ends of the tube there are bendable flaps.  Make sure one flap is tight to the tube and the other one is open. Slide each of the bead slide beads in to the tube so that the threads between the bead slide beads and the peyote bracelet beadwork fit into the slot.  All the peyote delicas sit outside the bead slide.  Once you have worked all the bead slide beads into the tube, close the second flap of the bead slide.


The delight of these bead clasps is that this is all you have to do!


Wednesday, October 21, 2020

Inspiration: Singularity


I often find the simplest designs are some of the most striking, easiest to match to an outfit or look.  This means they are often the ones I wear the most.  Growing up, I identified as a rock chick or goth and black remains my go to colour for clothing.  Now, it's more about the fact it makes a really good background for bright colours than identifying myself with a particular culture....  I also love silver jewellery more than gold.  So black and silver is a match made in heaven to me.  Striking, classy and easy to wear...  So singularity pairs up a couple of my absolute favourites.

Matte and frosted beads give a beautiful softness.  Matte black beads swallow the light and appear blacker than opaque black beads.  There are black paints now that almost absorb all light that hits them.  Vantablack absorbs 99.965% of light.  This paint is licences to Anish Kapoor and is not available to other artists but it has been used on a BMW concept car and watches by H. Moser & Cie.  It is however highly toxic, cannot be taken across borders, has to be applied and sealed in a lab, has a tendency to get very hot and is also phenomenally expensive....

Stuart Semple was incensed that one artists had managed to monopolize the world's blackest and black and has been vocal about it ever since.  He first released PINK, the world's pinkest pink and all buyers had to sign saying they were not associated with Anish Kapoor and in no way would the paint be able to fall into his hands.  He later released Better Black, then Black 2.0 and most recently Black 3.0, which are all  considerably cheaper than Vantablack and available to everyone (except Anish Kapoor).  You can read more about that story here

I called this design because there is just one stripe, it's a singular stripe, so singularity seemed perfect.  It also really appeals to the science geek in me...  A singularity is what exists at the centre of a black hole, it's a point where matter becomes infinitely dense.  It has a wierd affect on time....  Light can not escape from a black hole...  So it suits the matte black of the beads.

The silver stripe reminds me of a horizon and black holes had a special type of horizon, an event horizon.  This is the boundary beyond which any object or light can not escape from the black hole.  Stephen Hawking found that blackholes do emit some radiation though and he believed that as pairs of particles and anti-particles hit the event horizon, one of the two would be reflected and escape the black hole.  Light has even been observed shooting out of a blackhole now.  

Honestly, I don't think we understand them too well...  It's hard to really understand something so hard to observe...

Singularity images were hard to find on pinterest.  I did learn that BTS had a song by that name though.  I also learnt there is a Marvel character called Singularity.

Friday, October 16, 2020

Tutorial: Toggle Clasp #2


Weave any loose ends into the beadwork and finish as you normally would for your choice of thread.  Do not remove the final working thread from the beadwork at this point, in case you need to adjust the bracelet length.

This toggle clasp has anchor points that are parallel to the clasp and is connected to beaded loops via beaded rings.

I like to finish the existing thread and begin a new thread for the clasp.  This means that if the clasp thread should wear through, the beadwork will remain intact.

Begin with the toggle and thread ten beads as below.
Take the thread through the attachment loop of the toggle.

Form a ring by taking the thread through all ten beads again, making sure that the ring is tight enough that the metal of the clasp sits on beads, not thread.  Finish off your thread.  I took the thread through the ring a total of three times and then made an overhand knot using both threads, which I tightened while pulling the two threads apart to ensure the ring is tight.  I then threaded through two beads and did a half hitch around the thread bundle before weaving on and then trimming the thread.  I then took the second thread and repeated in the opposite direction.


Repeat with the ring section of the toggle clasp.


Returning to the beadwork, working at the end marked start in the diagram above, add a new thread and exit the bead work as shown below.  I like to finish the existing thread and begin a new thread for the clasp.  This means that if the clasp thread should wear through, the beadwork will remain intact. 

Identify the two middle high beads of the beadwork and weave to and then through the first of these.  In this bracelet there is an odd number of high beads so the clasp will be slightly off centre.
Pick up nineteen beads.

Pass the thread through the attachment loop of the beaded ring attached to the toggle.  The thread path of the beaded ring is now coloured green.
Miss the last ten beads picked up, beads 10 - 19, and pass through the ninth bead then continue through the eight, seventh, sixth, fifth and lastly the fourth.  There will now be a stalk from the end of the beadwork with a loop connecting the toggle to the beadwork.
Pick up three beads and pass in to the other central anchor bead previously identified as shown below in red.
Weave the thread through the beadwork and back up to the first anchor bead for the clasp attachment as shown by the blue thread path.  The thread path goes up the stalk, around the loop and back into the second fork of the fork.  The stalk now attaches directly over the first of the two central high beads.
Bring the thread through the second anchor bead indicated red.  This time the thread goes the opposite way so the stalk sits directly over the anchor bead.  Weave the thread away and finish.

Check the length of the bracelet on your wrist with the two clasp pieces joined and add or remove rows as required and finish off the thread.  Add a new thread to attach the metal clasp ring, exiting the beadwork as shown below.
Work through to the first of the high beads in the middle of the row.
Pick up twelve beads
Take the thread through the beaded ring attached to the metal ring of the clasp then through the second of the two middle high beads.
Weave the thread through the beadwork as shown by the blue thread path then up to the first of the middle high beads.  Pass through this bead in the opposite direction to before then thread through all the beads of the loop and into the second of the middle high beads, also in the opposite direction to before.  This will pull the first beads of the loop over the tops of the middle anchor beads.  Weave the thread away and finish.

Sunday, October 11, 2020

Inspiration: Cornish Tartan


When I moved to Cornwall twenty years ago, I knew very little about Cornish history and heritage but I was very interested in finding out more about this beautiful place.  I expected to only be here a few years, but I met a Cornishman and never left.  One of the many things I had no idea about was Cornish Tartan.  

It's common to know about Scottish tartans, particularly if you have Scottish ancestry as I do, but tartan is a celtic tradition.  It is believed that the Cornish wore tartans of some sort as there are references to garments that were checkered or freckled.  Altarnun Church, which dates back to 1510, was found to have carvings of people wearing kilts by the historian and poet L.C.R. Duncombe-Jewell.

Cornwall did not have clan tartans in the same way as Scotland though and the tartans now registered with Scottish Tartans Authority are all of more modern design.  The first of these was the Cornish National Tartan which was registered in 1963 having been designed by E.E. Morton-Nance.  Each part of the design relates to an aspect of Cornish history and identity. 

Before Cornwall became Cornwall it was the kingdom of Dumnonia and this encompassed all of Cornwall and Devon with part of Somerset and Dorset.  This kingdom existed between the 4th and 8th centuries with territory gradually reducing as the Saxons advanced, pushing Dumnonia back to Cornwall.  In 1066 the last surviving member of the Cornish royalty, Cadoc, was made Earl of Cornwall by William I of England following the Norman Conquest.

The history of the ancient kingdom of Dumnonia has been rendered particularly murky because of it's close ties to Arthurian legend.  It's believed Arthur was of the royal Cornish line and born at the castle of Tintagel and that he died in the Battle of Camlann believed to have been fought at Slaughter Bridge near Camelford.

Legend has it that Arthurs spirit took the form of a Chough when he died.  Some versions say the bird was originally a Crow but it's legs and beaks were turned red by the blood of the battleground.  The legend also stated that if the Chough ever left Cornwall, it's return would herald the return of King Arthur.  The bird did become extinct in Cornwall with the last breeding recorded in 1947 but returned in 2001.  There are now a number of breeding pairs!

The Chough is a member of the Corvidae family of birds that includes Crows and the red beak and legs are it's distinguishing feature.  It has long been associated with Cornwall and it is considered very bad luck to kill one.  As the emblem of Cornwall it is part of the logo for Cornwall Council.

St Piran is the patron saint of Cornwall and the flag of Cornwall is known as St Piran's flag and is black with a white cross.  Legend has it that he came from Ireland where he was tied to a millstone and cast in to the sea by some heathens.  Perran Bay is a beautiful sandy bay, backed by sand dunes and it is here, at Perranzabuloe that he reached Cornwall.  He became a hermit there and established the first Oratory which was later replaced by a stone building.  The oratory was abandoned in the tenth century when it was engulfed by sand.  It was excavated in 1910  but then reburied.

St Piran is the patron saint of tin-miners and is credited with the rediscovery of how to smelt tin as this art had been lost after the Romans left.  It is believed his hearthstone was made of tin bearing rock and the fire caused some of the tin in the rock to melt.

Cornwall is known for it's long history of mining, not just tin but other metals too and stone for building.  The sea is never far distant either, no matter where you are in the county.

So the colours chosen reflect aspects of Cornish history...  Black and gold were the colours of the Kings of Dumnonia.  Black and white are the colours of St Piran and the tartan features the white cross on a black background.  The blue is for the sea and the red is for the Chough and the blood of Arthur.  I like to think the black is also for the Chough!  

It's not surprising I was inspired by the Cornish Tartan!  It was a tricky project though.  Many tartan or plaid patterns are completed using a loom or turned in to diamonds in peyote patterns.  I wanted to get the whole pattern in and keep it as square as possible.  I eventually realised that having it at an angle would allow the pattern to be fully represented.  I have the pattern as an A4 which I may also release as a chart and I would also like release a brooch pattern which I have developed but not made as yet.   This bracelet pattern is the first, for now!

Want to look at the images which inspired me on pinterest?

Friday, October 9, 2020

Tutorial: Bead Slide with Chain to Single Toggle Clasp

Weave any loose ends into the beadwork and finish as you normally would for your choice of thread.  Do not remove the final working thread from the beadwork at this point, in case you need to adjust the bracelet length.

For this bracelet I used two miyuki 35mm bead slides and then attached a toggle clasp with chain.  These bead slides take size 11 beads and I used the same delicas I used for the bracelet.  They also have two attachment loops whereas shorter tubes only have one.

I like to finish the existing thread and begin a new thread for the clasp.  This means that if the clasp thread should wear through, the beadwork will remain intact.

Working at the end marked start in the diagram above, add a new thread and exit the bead highlighted in the close up below.

Thread through to the first bead of the last row (highlighted in blue) and thread through it.

Pick up the first bead slide bead (bead slide beads are shown as being larger to highlight them but all beads used are the same size).

Thread through the previous bead from the original beadwork (highlighted in blue) in the same direction as before (brick stitch).


Stitch through the beadwork to the next high bead (highlighted) and pass the thread through it.

Carry on adding the bead slide beads in the same way across the end of the beadwork and finish the thread off.

The bead slide consists of a tube with a slot in the side.  At the ends of the tube there are bendable flaps.  These tubes have two rings for affixing clasps.  

Make sure one flap is tight to the tube and the other one is open. Slide each of the bead slide beads in to the tube so that the threads between the bead slide beads and the peyote bracelet beadwork fit into the slot.  All the peyote delicas sit outside the bead slide.  Once you have worked all the bead slide beads into the tube, close the second flap of the bead slide.


The beadslides have two rings attached so you can add two catches if you wish.  I decided to attach chain between the two rings using a jump ring, but you can also use a split ring.  Split rings require a special tool to open easily but this means there is no chance of things slipping through gaps accidentally.  If you use jump rings open them with pliers, by moving one end to the side as this does not stretch the ring and allows it to be easily closed by flattening it with pliers.


Thread the chain and one of the bead slide rings into your jump ring or split ring.  Attach a jump or split ring to the main part of the clasp and then thread the chain through the ring attached to the clasp.


Decide how long you want your chain and then use snips to cut it.  Use another jump or split ring to join the free end of the chain to the second bead slide ring.


Add jump or split rings to the toggle of the clasp so that it has enough length to fit up in to the main part of the clasp.  For my toggle I added three rings.  Add chain to the rings of the beadslide in the same way, threading the toggle on before adding the chain to the second ring of the bead slide.


At this point, I like to check the length of the bracelet and ensure it is a good fit, now I know the length of the clasp exactly.  If necessary, add or remove rows with the remaining working thread and then finish the thread.

Add a new thread and brick stitch bead slide beads on to all the high beads on the end of the beadwork in the same way, before sliding the bead slide beads into the tube and sealing it closed.

If the attachment loops to either parts of the clasp are perpendicular to the clasp, the addition of a second jump ring will allow the clasp to sit flat instead of twisting.


Inspiration: Eggs

When it comes to Easter, chocolate eggs are the first thing many think of.  Certainly I love them!  Eggs are a symbol of fertility and acros...