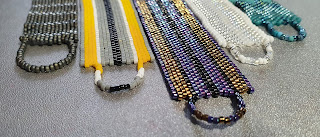
Loops are useful in forming a clasp and there are different styles. When creating a clasp with a button, I often like to use a wide loop that attaches to the beadwork with roughly the same distance between the two anchor points as the diameter of the button. This makes the clasp less fiddly to do up and undo.
It is only suitable for use where it is intended that the bracelet is work tight to the wrist. If the bracelet is not worn in this way, the wide loop will mean the clasp is likely to become undone unintentionally.
You can experiment with the colours of the loop to match your beadwork, or just choose one colour.
Firstly, identify the anchor columns of the beadwork, shown as blue and red. These columns should be the two outer columns of the beadwork that have their full width underneath the button.
This will enable you to identify the position of the red and blue beads shown below, which are the key points at which the loop is anchored.Add a new thread in your usual way and stitch through to the red bead from the edge of the beadwork.Add beads to the correct length for the loop. This is likely to require a little experimentation. I like to leave a small gap between the two ends of the beadwork of about 5mm. These allow the ends of the beadwork to be pushed together when loosening the clasp so the loop can be removed from around the button. Leave this gap when calculating the right number of beads to add and also account for the fact it will go under the bead.Once you have the appropriate number of beads, you need to attach the other end of the loop. Don't stitch through the blue bead however, stitch into the bead highlighted green. The bead highlighted blue is not a high bead at the end of the beadwork, so the last bead of the loop, highlighted light blue will actually become a high bead on top of the blue bead. Stitch round so that you pass through the yellow bead.Take the thread through the light blue bead in the opposite direction to before, so that the bead is pulled into the gap between the two high beads of the peyote bracelet. Then stitch through all the beads of the loop. Previous bead path is shown in grey now.Stitch through the red bead in the opposite direction. Then you can either stitch round and go through all the beads in the loop again, or you can stitch away then finish your thread.This loop can be created as one half of several types of clasps. I like to pair it with buttons and will be releasing a number of tutorials for attaching buttons to beadwork.


No comments:
Post a Comment