Friday, January 22, 2021

Bracelet Finishing Tutorial: Triglide Slider Buckle

This clasp design is based on a belt using a triglide slider buckle.  This sort of buckle is a metal rectangle with a bar across the middle that is not fixed in place and moves across the buckle.  One end of the beadwork is looped around this moveable middle bar and the other end of the beadwork is then threaded through the clasp.  When you pull it tight the moveable bar tightens against the loose end of the beadwork.  

The only problems with this is that the bracelet will work itself loose over time, but I have a little trick to stop this from happening!  I also added a loop to stop the loose end flapping, just like on a belt.  This is not perhaps a good choice of clasp for those with little experience of peyote stitch.  It has a number of different elements, including reducing peyote and ditch stitch.

For this bracelet I used a 20mm bronze triglide slider buckle.   The precise one I used is no longer available on amazon but it looks to be pretty generic and commonly available.  The bracelet was 14 rows wide using delicas.  This means the free end of bracelet fits through the clasp just fine when putting it in place.  The fixed end however needs to be narrowed a little to have a loop flat around the moveable bar because the bar is not flat for the width of the clasp.

Start a new thread and then add the the first row of peyote for the loop for the sliding bar using the thread path shown.  Continue adding additional rows of peyote to get the required length for your loop.  You need the loop to be loose around the slider bar because it will need to move.  The thread will exit the bead highlighted blue when finished.

Thread the loop around the slider bar.

Fold the loop around the bar and attach the end of the loop to the base of the loop to finish it off.  The beads highlighted red are closest to the main part of the beadwork and the green beads are the beads at the end of the piece of beadwork created to make the loop.  Go through the join twice if desired and then finish off the thread.


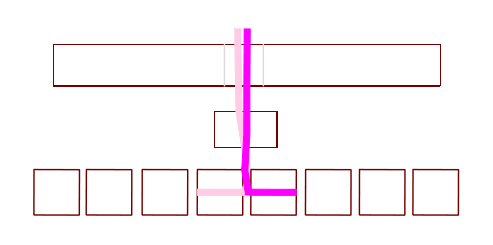
The bracelet is based on a belt so needs to be longer than the length of the wrist.  Mine is about two inches longer and the end not attached to the triglide can be finished square or tapered.  Below is a chart showing the version I used which was an asymmetrical taper.


Next create the loop that fits around the beadwork to hold the loose end of the bracelet in place.  Mine is six beads wide and 28 beads deep.  While it fits closely, it isn't perhaps tight enough so there is some movement.  I don't know that you could take two rows out and it not be too tight but feel free to experiment!

Take the strip of beadwork and turn it into a ring, then thread it on to the beadwork.


At this point you can wear your bracelet but as you move, it will work itself undone over time and it risks being lost.  You can add a little tab or flap to the beadwork that stops the clasp from moving back up the beadwork.  Mine was six beads across and 9 rows deep (4 - 5 beads due to the odd number of rows).  

I made sure this flap was well attached because it take most of the strain of holding the bracelet shut.  You need to attach it to the bracelet in the correct position to hold the clasp in the place you want it.  Create the tab by attaching each row to the beadwork and then continue for the additional rows.

Begin by adding a new thread then stitch through five columns.

Add a new bead across the next column and then stitch into the 7th column bead on the same row as the bead you exited in the fifth column.  This is often called ditch stitch because you are adding a bead into the ditch created where two beads meet in an existing piece of beadwork.

Add a further two beads in this row using ditch stitch before stitching through to the edge of the beadwork.

Stitch back and add a further three beads using ditch stitch to create a second row of beads.

Add a third row.

Add a fourth row.

Stitch through to the edge of the bracelet then turn back and go through the very first ditch stitch bead you added.

Each individual yellow bead is connected to the bracelet and we now stitch through them to turn them into a little piece of peyote stitch.  From this point you no longer need to stitch into the beads of the main piece of beadwork.

Having sewn all the anchored yellow beads together as a piece of peyote, we now add additional rows to this well anchored peyote to create the flap.  These beads are not stitched to the bracelet and are coloured red.

Once you have created the tab, finish off your thread in your normal way, without attaching any of the red beads to the bracelet.  You can further stitch the yellow beads to the bracelet if you desire before finishing the thread.


Here is the completed bracelet being worn!


Tuesday, January 19, 2021

Inspiration: Love

I had to study Latin at school and one of the few things I remember (apart from that I really like the design of their villas) was that they have multiple words for love.  It introduced me to the idea that there are different types of love and that it is not understood in a universal way.  After all, love is a luxury in a relationship if you just need to survive but a necessity between parents and children for the next generation to prosper.

When I was younger, I had a very idealistic, romantic view of love.  I think I assumed passion and love went together indefinitely as well.  I have been with my husband for nearly two decades and  that first flush of romance and passion has settled into something warm and deep, comfortable yet fun.  I still love romance though and it's one of my favourite genre of books.  I understand now that those first heady flushes are not sustainable, it's a transient feeling, but I would rather have what I have now than hunt for greener grass, because the hunt would never be finished.

I see us growing old together and remaining happy.  It's hard to envision life without him and tricky to remember what it was like before we met.  I suspect things would have shifted if we had had children, but we never did.  We have always been able to prioritise our relationship so we have not grown apart.  We both have our own hobbies and friends that relate to our interests.

Roses are great symbols of love and the background to my love design was designed using petals...  but not from Roses.  Roses don't blossom in February without help but Camelias do.  In Cornwall, we have an unusual climate for the UK and camelias grow well here.  They actually seem to have very similar symbology to roses and the different colours have similar meaning.

I like to take one of my photos with some nice texture and colour and blow it up, turn it in to a piece of beadwork using software and then pick bits I like and play with them to create abstract designs.  The camelia was largely red but the shadows came out more maroon.  When I came to bead it, the maroon and deep reds did not translate well at all.  I didn't like it.  I played with the colours extensively before settling on rich purples with more red than blue tones and some beads with hints of magenta.

I really adore how it turned out in the end, but its hard to photograph.  Many of the pink tints come from AB finishes and I just have not found how to get these to show well, yet.

But I like the idea of love being red, purple and pink more than I like it being red and darker red.  It feels more balanced, more representative of the wide range of feeling love includes...  well kind of, I don't think it represents some of the gentler forms of love, familial for instance.  It would need more white and yellow.  But its a Valentine's pattern really, so I guess it never needed to cover the whole range!

Friday, January 15, 2021

Tutorial: Reduced Non-tapered End for Slide Bar Loop Clasp

Sometimes you may want to use a clasp that is not as wide as your beadwork.  This has the benefit of allowing you to not have the clasp overhanging to the sides at all and reduces the impact of the clasp.  Sometimes it's just that you have a particular clasp handy.

There are different ways to make it work and your choice will vary according to the type of clasp.  In this case I am using a slide bar loop clasp and a non-tapered end.  It's 31.5mm which is a little larger than the ones I generally use but it doesn't fit with a precise number of columns as exactly as the 26mm.  Not for delicas anyway, it fits size 11 beads more snuggly.  I wanted to keep the end to even count peyote so used 16 columns of delicas.  This leaves a little movement for the bar of the clasp but this doesn't bother me.

My piece of beadwork is 26 columns wide so I need to create the loop for the clasp five columns in on each side.  If you need full directions for a slide bar loop clasp then they can be found here as this tutorial gives condensed instructions for using this clasp.  This version has no taper to reduce the end and the pink lines show the position of the reduced end used to form the loop for the clasp.

Add a new working thread for attaching the loop so that if you ever need to replace the clasp, you can do so without disrupting the main beadwork.  Because you are continuing the existing peyote you need to make sure you begin in the right place.  The first bead of the first row of the loop will not necessarily be at the same side as you finished the main beadwork.  If you have an odd number of beads between the edge of the main beadwork and the pink line showing the position of the tab, then you will need to stitch through to the opposite side you finished on.

In the diagram below, the last bead of the main beadwork is highlighted in green with the end of the thread from this point shown in light green.  The new thread is shown in pink and you need to weave through to the bead highlighted red in order to begin the first row of the loop.

Add a new row of peyote, the first row of the loop, keeping between the two pink lines.  The last bead of the main beadwork that you go through is highlighted yellow.

Add the next row of beads.

Having added two rows for the loop, add around a further eleven rows.

Thread the loop beadwork through the clasp.

Start zipping the end of the loop to the main piece of beadwork going between the orange and the green beads.  If you need further detail on this process, please go to this tutorial which shows each stage in far more detail.

Finish off your thread in your normal way and then add the second part of the clasp to the other end in the same way.


Tuesday, January 12, 2021

Inspiration: Hearts

 Many years ago, I was experimenting with puffy peyote where different sized seed beads are used to create a piece of peyote that is shaped rather than flat.  It was so long ago that I was still in my Matsuno bead phase.  I used several different sizes of carnival purple beads and I still have the bracelet...  I realised looking at it that there were hearts within the shapes of the bracelet and that if I used more colours, I could make them clear to others.

...but I didn't get round to doing anything with it....

Until now!  

I wanted to use Miyuki seed beads and it took a little experimenting because the different sizes of Miyuki beads are slightly different in relation to each other than the Matsuno ones.  Miyuki size 6 beads in particular are huge!

The heart shape is pretty distinctive but it represents the idea of the heart and is in no way an anatomical representation!  

The shape is that of peepal leaves and this tree has long been considered sacred in the Indus Valley region for thousands of years.  Siddhartha Gautama was sat under a peepul tree when he became enlightened, leading to the founding of Buddhism and because of this it is also known as the Bodhi tree.  A heart shaped pendant was found in the valley and is perhaps the earliest archaelogical find of a heart shaped object.

The silphium plant also inspired the use of the heart symbol and coins from Cyrene have this shape on them.  The plant was immortalized by Pliny and prized by the Egyptians and Romans and was extremely precious although no one is quite sure why!  It seems likely it is now extinct as it only grew in the area around Cyrene, a north African city and this area has seen considerable climate change.  Attempts were made to grow it and failed and it is believed the last stalk of it was given to the Emperor Nero.

It is believed that Silphium may have been the first effective contraceptive and allowed those that could afford it to be free in their love without risking pregnancy.  Romans are believed to have been very sexually promiscuous and to have taken part in orgies.  This may or may not have been true but their art certainly suggests they were open about sexuality.  Did access to a reliable contraceptives fuel a Roman love revolution?  Certainly in our own society, the availability of the contraceptive pill in the 60s and 70s gave rise to free love and sexual revolution....  The impact of the pill on our society is huge....

So initially the heart shape related to plants and specific leaves but as time passed it became linked to romantic love and by the Middle Ages, this connection was believed to be well known, although the symbol looked a little different...  The point was generally upwards and the dent (now in the top) was not as well defined.  That said, heart shapes in heraldry dating to the 12th Century are believed to be representations of water lilies.  

I find it interesting that something so un-plant-like as the heart had its roots in plant leaves as a symbol.  The symbol is certainly a huge part of life now.  I have used this symbol multiple times today on social media....


This is my pinterest board here...

Friday, January 8, 2021

Tutorial: Toggle Clasp #5 (Hearts)

This tutorial is for a very small toggle clasp combined with a narrow bracelet end of size 15 seed beads and was developed for hearts.  It could be used with wider pieces of beadwork but the loop that  holds the ring part of the clasp would need to remain with a narrow gap between the two anchor points or it would risk curling the beadwork.  I don't know that it would work with size 11 beads.

The toggle clasp is a small silver heart set with a toggle about 1.5cm wide and the heart is less than 1 cm from top to bottom.  This makes it quite a tight fiddly clasp to do up but the style and scale match the bracelet.  As well as the clasp you will need three small jump rings, I think mine are about 4mm.  The bracelet is odd count peyote.

Begin at the top of the bracelet with the ring (heart) part of the clasp.  Add two jump rings to the attachment ring of the clasp to create a short piece of chain.  Use pliers to bend the ring open.  Move the ends to the side to create a gap rather than altering the curve of the ring.  This means that to close the ring, you just need to squeeze it flat with a pair of pliers.

Make sure the bracelet is finished so that the last row does not add a bead to the outside edges but does add a bead to the middle column as shown in the diagram below.  Then finish the thread in your normal way.

Add a new thread which exits the outer edge of the beadwork.

Pick up a size 15 bead and go into the high bead highlighted in blue.

Pull tight and then pick up another bead and go in to the bead just added, now highlighted green.

In this way, keep adding beads until you have a peyote stalk, two beads wide with eight beads on the outer edge and seven on the inner edge.  (The beads shown in the diagram are an approximation of the size 15 seed beads)

Pass the needle through the end of the short chain attached to the ring of toggle clasp, then thread the peyote stalk through the last jump ring of the chain as well.

Now bend the stalk over to the other side of the beadwork making sure it isn't twisted but it won't sit completely flat.  Stitch into the bead highlighted red which is part of the bracelet.

Stitch into the last bead of the stalk, highlighted light blue and then into the yellow highlighted bead on the bracelet.

The stalk is now a loop attached to the bracelet, attaching the ring part of the clasp to the bracelet.  I like to stitch through all the beads of the loop again to reinforce it.  Stitch through to the other side as shown, anchoring the thread through several rows of the beadwork.  This will bring you back to the starting point to stitch through the loop as before.  Then you can finish off your thread in your usual way.

Take the other end of the bracelet, the bottom.  Make sure the last row adds beads to the outer columns but not the middle column as shown below.  Finish the thread in your usual way.  Add a new thread and stitch through to the bead highlighted red, close to the middle of the last row.

Pick up twenty size 15 beads.

Add a jump ring to the attachment loop of the toggle part of the clasp.  Thread the needle throw the jump ring and bring the clasp down so the beads also thread through the attachment loop.

Stitch through the bead highlighted yellow.

I like to stitch through again, so stitch through to the other side of the beadwork, anchoring the clasp by stitching through a number of rows.  Make sure you exit at the same point as before, so that you can stitch through the loop as before.

Once you have stitched through the loop again, finish your thread in your usual way.


Tuesday, January 5, 2021

Inspiration: Heartbeat

The heart is a fascinating thing....  Its physical anatomy is very different to the stereotypical heart shape.  It is apparently simple but hugely complicated.  A pump with several chambers made from muscle.  It's easy to think it resides on the left of the chest but it sits in the middle, nestled between two lungs.  Wikipedia has some great pictures and animations. 

The hearts complicated manoeuvres are coordinated by electrical pulses to the different parts of the heart and give us the familiar heart trace that is the focus of the heartbeat design.  The rhythm is so complicated that while a heart in distress may be obvious on an ECG, it also, may be really difficult to identify.  These days defibrillators are very clever and they analyse the the heart rhythm and decide when to shock.  

There has been a huge community push to make sure there are defibrillators easily accessible.  In many small villages you can see them in accessible locations, sometimes in repurposed telephone boxes.  Communities, businesses and individuals have all come together to raise funds for a local defibrillator.  One such business is the Golden Lion, a beautiful pub situated on the shores of Stithians reservoir in Cornwall.  These community defibrillators give people the best chance at surviving a heart attack because the speed with which people receive treatment is a huge factor in their chances of survival.  Every minute counts and the closest defibrillator is now likely to be in your community, rather than in a hospital or ambulance.

I believe CPR is something that should be taught in schools and I have taken the opportunity to take first aid training on a number of occasions.  The British Heart Foundation campaign was great because it was fun and memorable, an inspired advert!  The benefit of adverts like this cannot be underestimated.  Tristin Saghin was nine when he saved his baby sister by performing CPR which he had learnt by watching TV.

My heart was on my mind when I came up with the idea for the Heartbeat bracelet.  I wanted to focus on a healthy heart and what that looked like.  It took me a little while to work out how to do that using peyote stitch, to give a result I was happy with.  It was an interesting challenge!


My pinterest board is here.


Friday, January 1, 2021

Tutorial: Heart Buttons (For Heartbeat)

Heartbeat uses heart buttons for the clasp.  I used green ones with the black and green colourway but other colours were available and one can be selected to match.  These buttons were purchased from the etsy shop BeadsButtons4Crafts.

Of course, there is no guarantee they will remain in stock, although they are in stock at this time.  They are approximately 16mm deep and wide.  They have two holes which are across the width of the button and they are large enough for a size 15 to sit within the hole.  Normally I would angle the button so that each hole is stitched on to different rows and columns, but I want these buttons to be attached straight, so both holes will be anchored to the same columns. The two columns to stitch the first button into are highlighted in red and blue in the diagram below.

I like to anchor the button to several different rows and columns so it does not pull on only one or two beads.  In this case it is anchored to four beads and the ends of these may pull up a little to form a tent like effect but it should be minimal as the number of beads has been maximised.  I also like to thread around a larger area round the button so that the button is anchored across the wider piece of beadwork as this will also help minimise the button pulling on the anchor beads too much.  

Attach your thread in your normal way and stitch through to the red bead and pass through it, heading towards the blue beads and the edge of the beadwork (but don't go through the blue beads).

Pick up a size 11 bead in a colour that will not stand out against your beadwork and then pass through the first of the button holes, then through the second hole and pick up a second size 11 bead.  The diagram shows both button holes because the view is from the side of the beadwork.

Stitch into the yellow bead closest to the end of the beadwork, heading through all three beads of the three drop.  Stitch towards the edge of the beadwork, turning at the edge before stitching through the beads so that you can stitch through the green bead as indicated.  Stitch up through the size 11, the second button hole, then the first button hole and down through the other size 11.

Stitch in to the far blue bead, then through the other two beads in the three drop.  The near beads are those beads in each column furthest from the centre of the cluster and the near beads are those beads in each column closest to the centre of the cluster.  Stitch through to the edge of the beadwork and then make the turn and stitch up and round before turning again and threading through the near red bead.  Stitch up into size 11, through the first button hole, down through the second and through the second size 11.

The diagram below shows how the button is anchored to the two columns but the threads go up into the size 11's from the gap between the two columns.

In the same way, stitch in to the near green bead and then stitch around to the near yellow bead and up through the size 11 and the second button hole.

At this point, this could be your last pass through the button as you will have anchored each button hole to four anchor beads.  If you want to stitch through a few more times though, you can, just try and keep your choice of anchor beads balanced between near and far, red and blue, yellow and green.

Choose some size 11 beads that either compliment your beadwork and the button or that will not be noticeable.  I used some crystal beads.  The holes for my buttons were big enough for the size 15's to sit inside the hole so allow two beads for the holes.  The gap between the two holes required three beads to cover the thread, so I picked up five size 15s in total.

Stitch back down through the first button hole and size 11 before stitching through the near blue bead and out towards the edge of the beadwork before turning and weaving the thread away and finishing in your normal way.

I chose to put a button at each end and they should have the same orientation to match and both be on the same face of the beadwork, so that they are visible when you wear the bracelet.  The diagram below gives a rough placement of the buttons.

At the other end, in order to place the button in the same place, some of the anchor beads are situated in the same rows as each other as follows:  far green and yellow beads, near green and yellow beads, near red and blue beads and lastly the far red and blue beads.  Attach the button in the same way, making sure you weave around to anchor the button well and using five size 15s to cover the button threads on your last pass.


Inspiration: Eggs

When it comes to Easter, chocolate eggs are the first thing many think of.  Certainly I love them!  Eggs are a symbol of fertility and acros...