
Heartbeat uses heart buttons for the clasp. I used green ones with the black and green colourway but other colours were available and one can be selected to match. These buttons were purchased from the etsy shop BeadsButtons4Crafts.

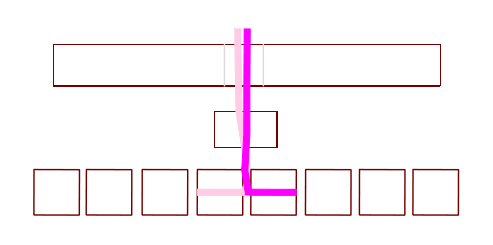
Of course, there is no guarantee they will remain in stock, although they are in stock at this time. They are approximately 16mm deep and wide. They have two holes which are across the width of the button and they are large enough for a size 15 to sit within the hole. Normally I would angle the button so that each hole is stitched on to different rows and columns, but I want these buttons to be attached straight, so both holes will be anchored to the same columns. The two columns to stitch the first button into are highlighted in red and blue in the diagram below.

I like to anchor the button to several different rows and columns so it does not pull on only one or two beads. In this case it is anchored to four beads and the ends of these may pull up a little to form a tent like effect but it should be minimal as the number of beads has been maximised. I also like to thread around a larger area round the button so that the button is anchored across the wider piece of beadwork as this will also help minimise the button pulling on the anchor beads too much.
Attach your thread in your normal way and stitch through to the red bead and pass through it, heading towards the blue beads and the edge of the beadwork (but don't go through the blue beads).

Pick up a size 11 bead in a colour that will not stand out against your beadwork and then pass through the first of the button holes, then through the second hole and pick up a second size 11 bead. The diagram shows both button holes because the view is from the side of the beadwork.

Stitch into the yellow bead closest to the end of the beadwork, heading through all three beads of the three drop. Stitch towards the edge of the beadwork, turning at the edge before stitching through the beads so that you can stitch through the green bead as indicated. Stitch up through the size 11, the second button hole, then the first button hole and down through the other size 11.

Stitch in to the far blue bead, then through the other two beads in the three drop. The near beads are those beads in each column furthest from the centre of the cluster and the near beads are those beads in each column closest to the centre of the cluster. Stitch through to the edge of the beadwork and then make the turn and stitch up and round before turning again and threading through the near red bead. Stitch up into size 11, through the first button hole, down through the second and through the second size 11.

The diagram below shows how the button is anchored to the two columns but the threads go up into the size 11's from the gap between the two columns.
In the same way, stitch in to the near green bead and then stitch around to the near yellow bead and up through the size 11 and the second button hole.

At this point, this could be your last pass through the button as you will have anchored each button hole to four anchor beads. If you want to stitch through a few more times though, you can, just try and keep your choice of anchor beads balanced between near and far, red and blue, yellow and green.
Choose some size 11 beads that either compliment your beadwork and the button or that will not be noticeable. I used some crystal beads. The holes for my buttons were big enough for the size 15's to sit inside the hole so allow two beads for the holes. The gap between the two holes required three beads to cover the thread, so I picked up five size 15s in total.

Stitch back down through the first button hole and size 11 before stitching through the near blue bead and out towards the edge of the beadwork before turning and weaving the thread away and finishing in your normal way.

I chose to put a button at each end and they should have the same orientation to match and both be on the same face of the beadwork, so that they are visible when you wear the bracelet. The diagram below gives a rough placement of the buttons.

At the other end, in order to place the button in the same place, some of the anchor beads are situated in the same rows as each other as follows: far green and yellow beads, near green and yellow beads, near red and blue beads and lastly the far red and blue beads. Attach the button in the same way, making sure you weave around to anchor the button well and using five size 15s to cover the button threads on your last pass.


No comments:
Post a Comment